
Flamenco Documentation
Installing Flamenco
To install Flamenco, download the distribution
and unpack it to yield a flamenco directory.
Type the command cd flamenco
to change into that directory,
and then give the command:
./installThe installer will scan your system for Python binaries and ask you to choose one. If it finds an acceptable version of Python, you can just press Return to accept it, or you can enter the path to any Python binary that's at least version 2.3. If the Python you choose doesn't already have MySQLdb installed, the Flamenco installer will attempt to build MySQLdb for you at this point.
You will then be prompted for a target directory in which to install Flamenco.
The default, /usr/local/flamenco,
is a reasonable place to install Flamenco if you are the system administrator.
If you are not using an administrator account,
you should choose a path that you control,
such as one in your home directory like
/home/username/flamenco.
The installation script will then automatically copy and unpack the files you need to run Flamenco.
Importing Your Data
The next step is to load your collection into Flamenco. You must first set up a directory containing all the required data files (see the data section for details on the names and contents of these TSV-formatted data files). After you have the data directory ready, give the command:
target/bin/flamenco import directory
where target is the target directory you chose for Flamenco and directory is the directory containing your data files.
Note that within the data directory, the text.tsv file is used by the target/bin/flamenco import command
to create a keyword index (to facilitate keyword search). If you have
not created and placed a text.tsv file in
the data directory, the following command will create the index
automatically (this may take a while depending on the amount of text
in your collection):
target/bin/flamenco index
directory
Importing a collection creates a new Flamenco instance.
Each instance of the Flamenco application is an independently running server,
with an associated collection, MySQL database,
and optional customizations to the user interface.
When you import a collection,
you'll be asked to provide login information for the MySQL account,
the name of a MySQL database, and a name for the Flamenco instance.
The instance will reside at
target/bin/instances/instance,
where instance is the name of the instance.
Important: Depending on your administrative settings, it may be
the case that the MySQL database must already have been created within
your MySQL account using MySQL administration tools before running the
installation script.
You'll also be asked to supply a port range for WebKit to use, with the default being ports 21600 through 21609. Each Flamenco instance corresponds to a WebKit server that runs on its own TCP port. When an instance starts up, it will check the ports in the specified range one by one until an available port is found. So, by default, it will attempt to take port 21600, and if that is in use or otherwise unavailable, it will try port 21601, then 21602, and so on. In most cases you will not need to change the port range, so you can just press Return when prompted. However, if you need to run more than ten instances, you'll need to extend the port range, or if your system has a firewall that blocks the default ports, you may need to change the port range.
You can create as many instances as you want with each one browsing a different collection (and using a separate MySQL database). You can even create more than one instance for the same collection (say, to try different variations on the user interface) as long as each instance uses a separate MySQL database.
The import script loads your data from the tab-separated files,
checks and normalizes it,
and converts it to a series of SQL statements.
If you need to save the results of this conversion,
you can supply a filename as an additional argument.
target/bin/flamenco import directory filename
If you supply a filename,
the import program will write the SQL dump of your collection to that file
instead of creating a new instance in Flamenco.
Installing the CGI Script
Finally, you need to place the Flamenco CGI script
somewhere that your Web server can see it.
As the installation script will tell you,
the file you need to copy is located at
target/bin/flamenco.cgi,
where target is the target directory you chose for Flamenco.
All Web access to all Flamenco instances
will take place through this one script.
You can put it anywhere that the Web server is willing to run CGI scripts.
If you have more than one version of Python on your system, you may need to edit the first line of the script to point at a Python executable that is version 2.3 or higher.
Then, use your Web browser to visit the CGI script in whatever location you put it. You should get a page that lists your instance. Click on the instance name to start browsing with Flamenco.
For example, for a web server is hosted at http://flamenco.university.edu, which processes
CGI scripts in the directory /projects/flamenco/cgi-bin/, you should place the
flamenco.cgi script in that directory. Then to access the live
flamenco instance, go to the url http://flamenco.university.edu/cgi-bin/flamenco.cgi,
which should show a link labeled with your instance name.
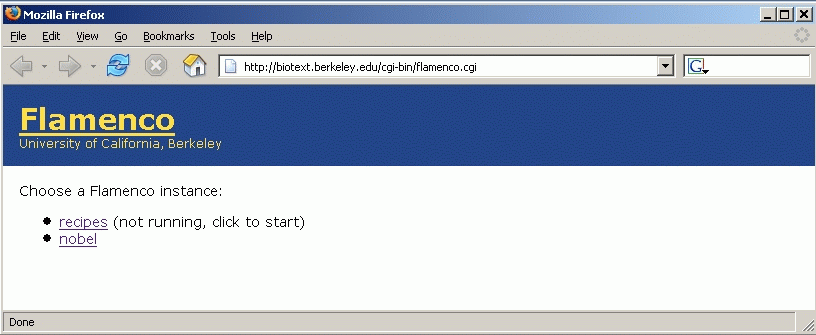
Clicking on this link should activate the instance. The image below
shows an example of what this start page should look like when two
instances (called recipes and nobel) have been installed
successfully.
Restricted Execution
Flamenco is normally set up so that anyone can start instances
just by accessing any URL that would be generated by the instance.
(Any URL that begins with the URL to the CGI script,
followed by a slash, the name of the instance, and another slash,
accesses a page generated by the instance;
http://flamenco.university.edu/cgi-bin/flamenco.cgi,
in the example above.)
This link can be
used to restart the instance if, say, its connection to the MySQL
server drops. Therefore, when showing users how to access your
flamenco instance, you may want to hide this url behind another
link within an html document.
Additionally, any user on the system where Flamenco resides
can shut down a Flamenco instance
by emptying the appserverpid.txt file in the
instance directory.
If you do not want other users
to be able to start or shut down a particular instance,
turn off world-write permission
for appserverpid.txt
and turn off world-execute permission
for flamenco-instance:
chmod go-w appserverpid.txt
chmod go-x flamenco-instance
These changes to the permissions
will also prevent the CGI script from automatically starting up the instance
whenever someone tries to access the instance;
you will have to use
flamenco start instance
to start the instance.